Photo Portal
HELP TOPICS
How do I get started?
To start using Photo Portal, download our free Photo Portal Server for your mac and Photo Portal App for your iPad or iPhone on the App Store.
Launch the Photo Portal Server from your computer and setup your user name and password. Review the instructions "Configuring the Server " for the configuration of Photo Portal Server.
-
Open Photo Portal App on your iPad/iPhone and login with the same user name and password previously used on the Photo Portal Server. Review the instructions "Work with Photo Portal".
Configuring the Server
It’s important to complete the server configuration before you start the iOS Application.
Install
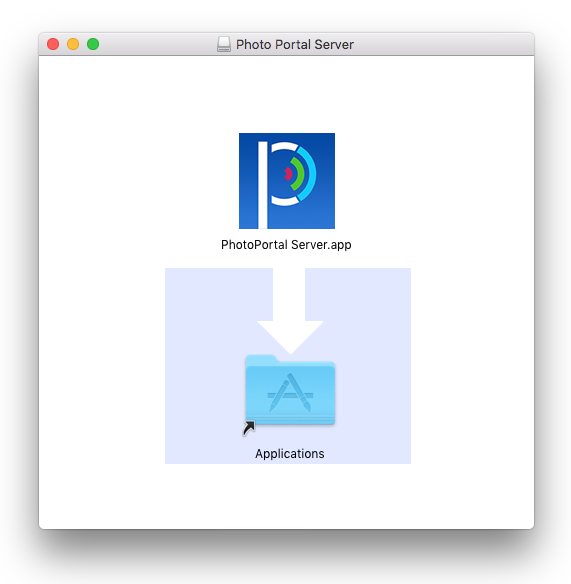
- Download and open the .dmg on your desktop
- Install the Photo Portal Server in your Mac Applications.
First Launch
- Launch the Server and the following message will appear : "Do you want the application "Photo Portal Server.app" to accept incoming network connections?" Click the "Allow" button.
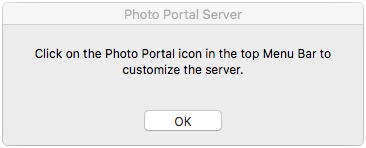
- Please wait until the server displays this message: "Click on the Photo Portal icon in the top Menu Bar to customize the server." Then click the "OK" button.
OSX Configuration
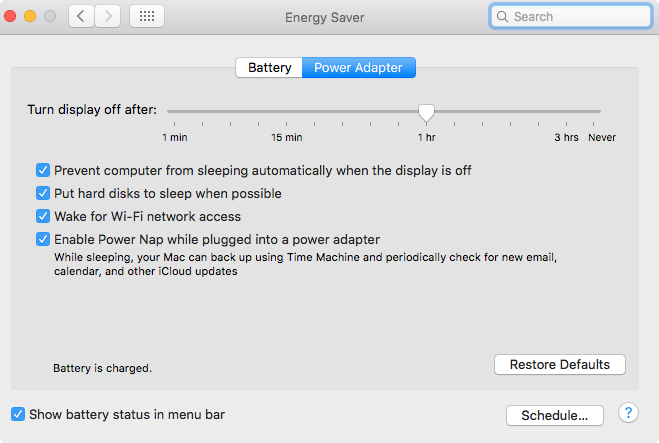
- Open "System Preferences\Energy Saver" and enable wake for Wi-Fi network access.
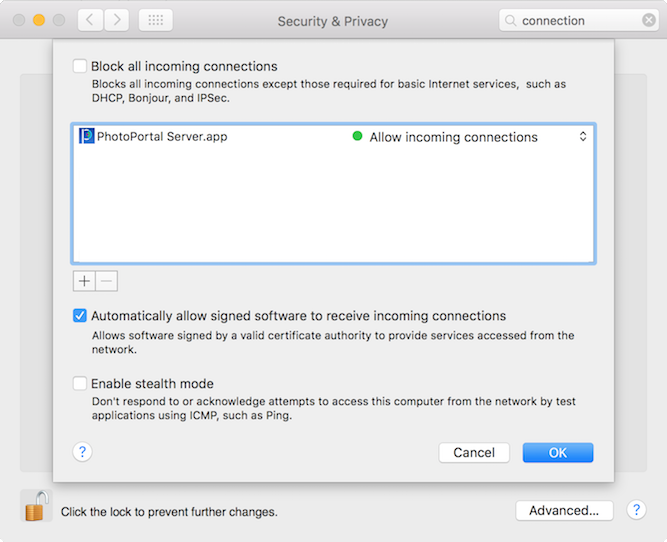
- Open "System Preferences\Security & Privacy\Firewall" then click on the padlock and enter your password, click "Firewall Options" and make sure you have accepted incoming network connections for Photo Portal.
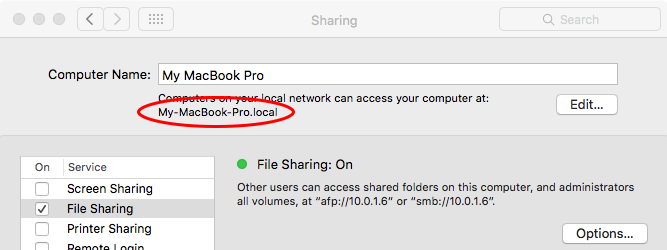
- Open "System Preferences\Sharing". You will then find the local hostname used by the server for the local address. You can change the local hostname to avoid conflict with other local network. It is recommended that you choose a unique name.
Local access
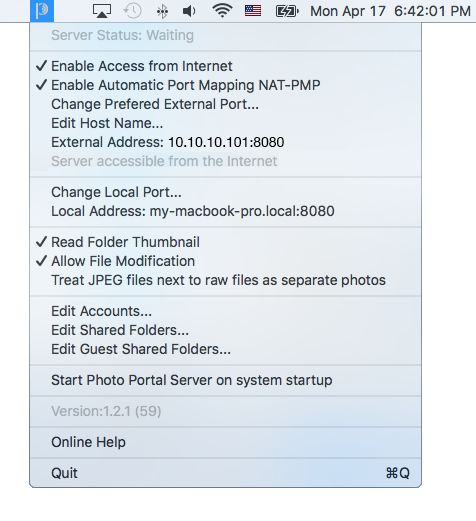
- Click on the
 icon located in the top menu bar to access the menu.
 - Set the local port (By default it is set to 8080 and in most cases it will work correctly). However, you can choose another number to avoid conflict with others services on your computer. If you change the local port, you need to restart the server application before you continue.
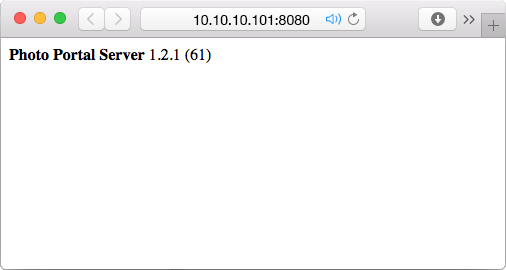
- Validate the local server visibility by selecting the item "Local Address: My-iMac.local:8080" in the server menu. Your default web browser will open the main page of the server and display the version used. If the server version is displayed, this confirms that the server is visible in your local network.
External access
If you want to use Photo Portal outside of your network you need to follow these steps. Some internet providers can limit or prevent the use of Photo Portal outside of your home. However, you can still use the app with your personal Wi‑Fi network.
- Click on the icon located in the top menu bar to access the menu.
- Select "Enable the access from Internet" (Enabled by default).
- Set the external port (By default it is set to 8080 and in most cases it will work correctly). However, you can choose another number to avoid conflict with others services or with a port that could be blocked by your service provider.
-
Configure the port forwarding automatically or manually.
Automatic Port forwarding (Enabled by default).
If your router support NAT-PMP (like Apple AirPort for example), you can select the option to automatically configure the port forwarding. Many routers from internet providers support UPnP and can be automatically configured with this option.
- Check the item "Enable Automatic Port Mapping NAT-PMP" (Enabled by default).
If you enable this option and your router doesn’t support the automatic port forwarding, the menu item "Server Status" will display an error code or the message: "Mapping Unsupported". In this case, disable the automatic port mapping and proceed manually instead.Manual Port forwarding
Routers are all different so you must refer to your manual in order to configure the port forwarding correctly. In general you simply need to add an entry for the local port and external port in the "NAT-Port Forwarding" table of your router interface. This will allow the router to forward communications between your external port and the local port.
- You have to uncheck the item "Enable Automatic Port Mapping NAT-PMP" to disable the automatic mode and proceed manually.
- Configure the port forwarding directly by opening your web browser to access your router interface (See your router instructions).
This site portforward.com has instructions for the configuration of most router manufacturers.
- If you used a Dynamic DNS service you need to set the hostname, otherwise skip this step. This kind of service is a recommended approach in order to stabilize access to the server by using a host name.
Dynamic DNS service
Dynamic DNS are used because ip addresses can change anytime. This will allow you to stabilize the server access by using a hostname "yourname.mydns.net" instead of the ip address "10.10.10.101". Dynamic DNS services (like noip.com) normally come with a desktop app, which is use to keep track of your ip address on their server.
- Create and setup your account on your Dynamic DNS provider
- Click on the icon located in the top menu bar to access the menu
- Select "Edit Hostname…"
- Fill the "Hostname" e.g "yourname.mydns.net"
This feature is needed to synchronize the hostname with the iOS App.
If you set the hostname, the "External Address" item from the server menu will replace its external ip by the hostname. If you want to work with your ip address, leave this field empty.
- Validate the external server visibility
Validate the external server visibility by disabling WiFi on your iPhone or from any computer or mobile device not connected with your local WiFi network. If you test by disabling the WiFi on your iPhone, you still need a 3G cellular connection to perform the validation from the internet.
- Open your web browser and enter the value displayed in the server menu item "External Address", like this: "yourname.mydns.net:8080" or "10.10.10.101:8080".
- Your web browser will open the main page of the server and display its version. If this step worked, it means that the server is visible from the internet.
You need to perform this test that way because many routers do not allow you to use the external ip address on your local network. This is why with some routers the server displays "Server not accessible from internet" but it’s not always the case.
Account Configuration
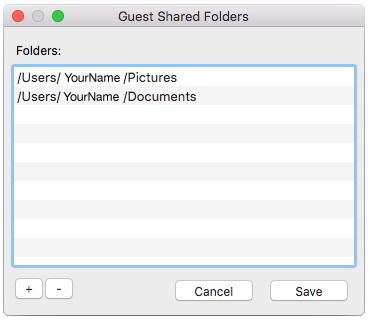
Photo Portal Server lets you set up your account and optionally add a guest account (useful for other members of the family). The guest account is limited and cannot use these edit options: "erase, rotate, flag, rate, tag" your photos. You can also limit it to specific folders.
Set up the Photo Portal Server Account on your computer
- Click on the icon located right in the menu bar to display the menu
- Select "Edit Accounts..."
- Fill the "User Name" and "Password"
- Click on "Save" button

Publish Photo Library
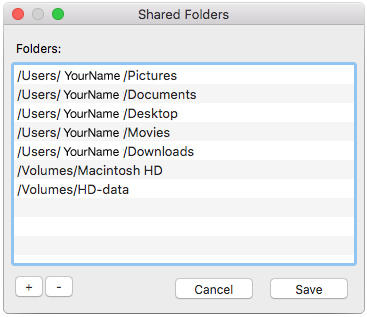
Photo Portal Server will publish by default all available folders and hard drives of your Mac. But if you want it is possible to select specific folders. Also, it is possible to create different list of folder for each kind of account.
Set up your shared folders
- Click on the icon located right in the menu bar to display the menu
- Select "Edit Shared Folders..."
- Click on the "+" to add a folder and "-" to remove a folder"
- Click on "Save" button
if you remove all folders, then all your hard drives and folders will be available again.
Set up shared folders for your guests
- Click on the icon located right in the menu bar to display the menu
- Select "Edit Shared Folders..."
- Click on the "+" to add a folder and "-" to remove a folder"
- Click on "Save" button
Work with Photo Portal
Server Address
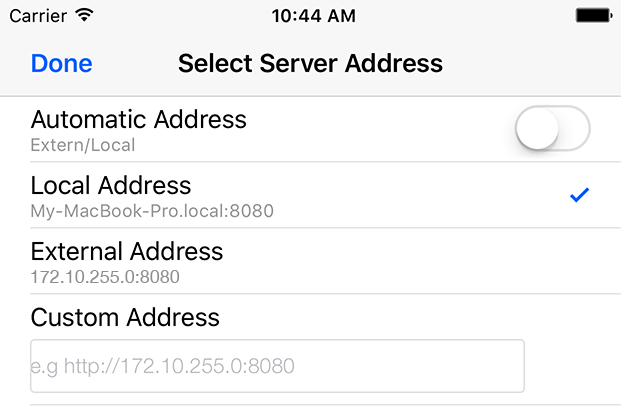
Photo Portal App will automatically synchronize the local and external server addresses at first launch. To synchronize these addresses you need to start the server and the application in your local network. The selected server address will be shown in the first item beside the server icon. If you tap on this item  "Server Button", a menu will show different options to select the server address. By default we set the local address mode. If Photo Portal App cannot establish a connection with the server, the following message will appear: "Server not found"
-
To change the current address mode you simply have to tap on the server button to display the menu, then tap on the desired mode to select it.
Automatic address mode
This mode will automatically switch to your local address when you are in your local network and when you leave your local network the external address will be used. The automatic changing between the local and external address can take a few seconds. We recommend this mode, if your router has limitations with the use of external ip inside your local network.
Local address mode (Enabled by default)
Local address mode If you didn't setup the external mode "Access from internet" you can only use the local address and disable the automatic mode.
External address mode
If your router doesn't have the limitation with the use of external ip inside your local network and you had setup the external mode, you can only use the external address and disable the automatic mode.
Custom address mode
The custom address could also be used but you need to fill the address manually. This could be useful if you are not at your home and you need to change the address manually.
You can also manage the current address manually and choose between the external or local depending on your location.
Photo Portal App will try to update your external ip address each time you reconnect to your local network.

Sign in
- Set up your account with the same "User Name" and "Password" you entered in the "Photo Portal Server"
- Tap "Login" to enter
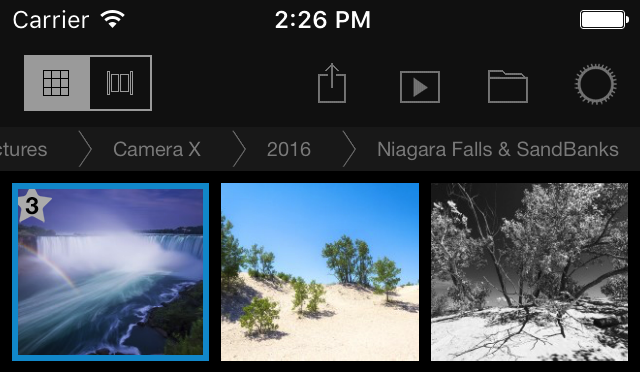
Interface

A. Grid Mode
B. Compare Mode
C. Share
D. Slideshow
E. Browser
F. Setting
G. Erase Photos
H. Rotate Photos
I. Filter
J. Color Labels
K. Rating Stars
L. Flags
M. Filmstrip
N. Compare View
O. Path bar
Basic Gestures

Quickly tap to select a photo

Long tap to add a photo to the selection

Pinch and zoom to control the size

Swipe to scroll the photos

Hide/Show status bar with two finger tap in the Compare View
Browse your library
Quiclky browse
- Tap on the folder
 icon to display the "Browser" popover.
 - Tap on the chevron
 icon to list sub folders.
 - Tap on the
 item to view the contained pictures.
Path Bar
The path bar lets you browse efficiently by tapping directly to any folder in the hierarchy of the displayed path. For example, if you tap on the year "2016" you will be able to traverse to any subfolders under the year "2016" and select another one. If your path is very long the end part of the path will be displayed and you can swipe the path bar horizontally until the beginning is displayed. You can hide the path bar in the menu setting switch off the "Show Path Bar".
Compare Photos
Compare multiple photos side by side. Look up fine details with the pinch gesture, so you can check if your image is perfectly sharp.
- Tap on the
 to activate the compare view
 - Quickly tap in the filmstrip to select a photo
- Long tap to add a second or third photo to the selection
- Pinch and zoom to control the size
Erase Photos
Erase unwanted picures from your computer. The Trash option moves your files to the recycle bin. If you change your mind afterwards, just open the bin on your computer and put the photo back in its proper folder.
Confirm when you Delete Photos
This option is useful when you want to cleanup your photo library, because instead of having a warning message each time you remove a picture, it will instead move it directly to your computer trash.
- Tap on the
 icon to display the "Settings" popover
 - Tap the "Confirm When you Delete Photos" switch to enable/disable the confirmation message
To erase photos
- Quickly tap in the filmstrip to select a photo
- Long tap to add a second or third photo to the selection
- Tap on the
 to move to the trash selected photos
Rotate Photos
Sometimes your digital camera does not set the correct orientation to your photos. With this tool you can rectify the situation and rotate the image to landscape or portrait.
- Quickly tap in the filmstrip to select a photo
- Long tap to add a second or third photo to the selection
- Tap on the
 to rotate the selected photos
Rotate operations are compatible with major software applications in the industries. All your edits are automatically synced with file+xmp on your desktop.
META DATA
While reviewing your collections, you can choose to display the camera info, copyright, headline, descriptions, location and GPS. When you have a picture with gps coordinates embedded in it, the location “City, Country" will be displayed.
Show meta data
- Tap on the icon to display the "Settings" popover
- Tap the "Show Camera Info" switch to hide/show the camera info
- Tap the "Show Description and Map" switch to hide/show the description and map
- Quickly tap in the left corner of a photo in the compare view to hide/show metadata
Filter and Sort
Sort Tool
The sort tool allows you to display photos from a folder following a precise order. (Capture Time, File Time, Filename).
- Tap on the icon to display the "Settings" popover
- Tap the "Sort" item to show sort options
- Tap to select the order between (Capture Time, File Time, Filename)
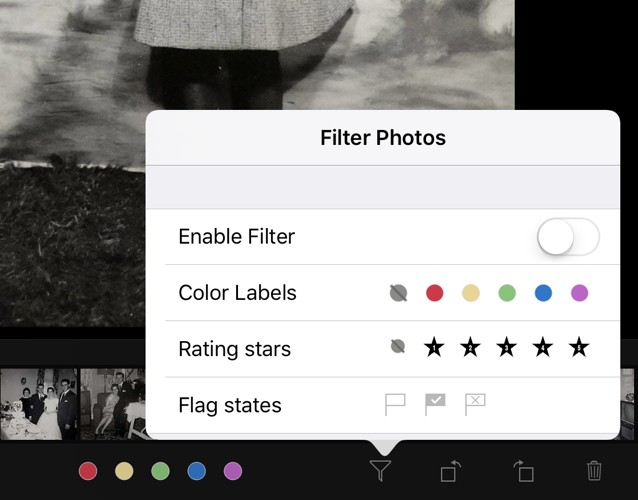
Filter Tool
The filter tool allows you to filter the view content, either by Flags, Stars or Color Labels.
- Tap on the
 icon to display the "Filter" popover
 - Tap the "Enable Filter" switch to enable/disable the filtering of the view
- Tap the Color labels you want to view (e.g.
 +
+  )
) - Tap the Rating stars you want to view (e.g. 3+4+5
 )
) - Tap the Flag states you want to view (e.g.
 )
)
FLAGS / RATING STARS / COLOR LABELS
Flags
Flags designate whether a photo is a pick, a reject, or an unflagged image. The Flag state is saved to XMP.
- Quickly tap in the filmstrip to select a photo
- Long tap to add a second or third photo to the selection
- Tap on one of these flags
 ,
,
,
,
 to assing the flag state to the selected photos
Flag states are saved to XMP. This is not compatible with other softwares.
Star Rating
Evaluate your photos by choosing a star rating between zero to five. The star rating is saved to XMP.
- Quickly tap in the filmstrip to select a photo
- Long tap to add a second or third photo to the selection
- Tap on the between zero to five to assign a rating to the selected photos
Rating operations are compatible with major software applications in the industries. All your edits are automatically synced with file+xmp on your desktop.
Color label
Categorize your photos by choosing a color. The color label is saved to XMP.
- Quickly tap in the filmstrip to select a photo
- Long tap to add a second or third photo to the selection
- Tap on one of these colors
 ,
,
,
,
 ,
,
 ,
,
,
,
 ,
to assign a color label to the selected photos
,
to assign a color label to the selected photos
Label operations are compatible with major software applications in the industries. All your edits are automatically synced with file+xmp on your desktop.
Share photos
Share the photos from your computer via email, text message, or on social networks like Flickr, 500px, Instagram, Twitter and Facebook.
- Quickly tap in the filmstrip to select a photo
- Long tap to add a second or third photo to the selection
- Tap on the
 icon to display the "Share" popover
 - Tap on the services (mail, Flickr, Instagram, Facebook, Twitter)
Slideshow
This simple Slideshow function allows you to display photos stored on your Mac's hard drive.
- Tap on the
 icon to display the "Slideshow" popover
 - Tap on the disclosure (i) to choose the transitions
- Swipe the slider to choose the duration
- Tap on the "Start Slideshow" to begin
Access photos in Lightroom™.
It is not possible to directly access the library of Lightroom with Photo Portal. But Photo Portal Metadata is compatible with Lightroom. You can only use Photo Portal to access the photos that are in the folders of your computer.
By default, Lightroom metadata is saved to the catalog file. For Photo Portal to view changes to Lightroom metadata (including ratings stars and color labels), the metadata changes must be saved to XMP in Lightroom.
- Instructing Lightroom to automatically write the changes into XMP. "LR > Catalog Setting > Metadata tab".
- Synchronize Lightroom metadata with Photo Portal by clicking the icon "Metadata Was Changed Externally"
To remove photos that have been deleted with Photo Portal, but not from the LR catalog:
- LR > Choose Library > Synchronize Folder.
- In the Synchronize Folder dialog box, select "Remove Missing Photos From Catalog".
To scan for any metadata changes made to the files with Photo Portal:
- LR > Choose Library > Synchronize Folder.
- In the Synchronize Folder dialog box, choose "Scan For Metadata Updates".
ADOBE PHOTOSHOP LIGHTROOM IS A REGISTERED TRADEMARK OF ADOBE SYSTEMS, INC.
Access photos in iPhoto®, Aperture℠ or Photo®.
It is not possible to directly access the library of iPhoto®, Aperture℠ or Photo® with Photo Portal. With the new version of Photo for OSX you can keep your original files within the structure of the hard drive folders.
With Photo for OSX you can keep your original files within the structure of the hard drive folders. Which means that you can now use Photo Portal to browse the content of Photo for OSX.
- Instructing Photo for OSX to not copy items to the Photos library. "Photo > Preferences > General > Importing"
iPhoto, Aperture and Photo are trademarks of Apple Inc., registered in the U.S. and other countries.